Collider
The demo version periodically pauses MIDI output. Purchase a code to unlock Collider.
Collider
Collider is a MIDI generator/effect. It does not produce audio by itself. The standalone app needs a MIDI output selected in Collider for the DAW to receive the MIDI.
Collider turns MIDI notes into balls that between two walls creating new MIDI notes new pitches with each bounce. The pitches follow the Pattern, Bounce Order, Root Key, and Scale Mode you select; the timing and feel come from the physics — gravity, bounce, time, wall shape, collisions, decay, and the number of bounces before each ball disappears.
Collider works best when it has access as many MIDI channels as you can afford it. It uses separate channels to manage overlapping bounce notes cleanly. Collider will still work with fewer available MIDI channels, but may not express older notes if the MIDI channels are needed for new notes.
Installation
Close your DAW. Install Collider. Start your DAW again. Rescan plugins if Collider does not appear automatically.
Mac note: On a Mac, the plugin is installed in your
Library/Audio/Plug-Ins folder.
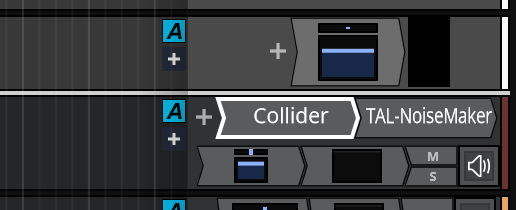
Collider in Ableton Live
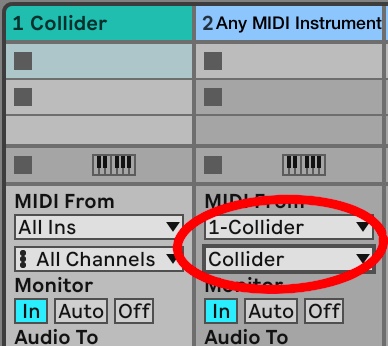
In Ableton Live, Collider needs its own MIDI track. Its MIDI output is then routed to an instrument on another MIDI track. On the instrument track, set the MIDI From selector to Collider. In the second routing dropdown below MIDI From, select the option that receives Collider's generated MIDI output.
Set the instrument track's monitor to In, so it can receive MIDI.
Collider in Logic Pro
In Logic Pro, first create a loaded MIDI instrument track, then run standalone Collider. Set the correct MIDI input and output in Collider. The MIDI In/Out panel is accessed by clicking the piano icon at the top left. Select your MIDI controller for input. On Mac, the best output choice is generally the IAC Driver.
Collider in Tracktion Waveform 13
Create a MIDI track, insert Collider first, then insert a MIDI instrument after it on the same track.
Collider in Other DAWs
Collider has not been tested in every DAW. Try the methods above, and I’d appreciate your feedback: send email.
Physics Controls
- Gravity: Controls the downward pull on the balls. Higher Gravity makes balls fall faster and bounce more quickly. Lower Gravity creates and more floating movement. Angling the walls is critical for containing balls in low gravity environments
- Bounce: Controls how much energy a ball keeps after hitting a wall. Low bounce = hacky sack. High Bounce = rubber ball.
- Sustain: Controls how much the MIDI velocity is reduced with each bounce. Higher Sustain values keep bounce notes longer. Lower Sustain values make notes fade faster.
- Impulse: Controls how fast the balls fire. Dynamic mode lets key velocity influence the launch speed.
- Time: Controls the speed of Collider’s physics simulation.
- Polyphonic / Mono Mode: Found at the top near the left. Polyphonic mode allows multiple balls at the same time. Mono mode keeps the behaviour focused on one active note or ball.
- Walls: Found to the left and below the Sequencer interface. Turns walls on or off. This can stop all bouncing and let balls clear away. It can also work as a panic-style control to turn off all notes.
Other Options found in Settings
- Collisions: Turns ball-to-ball collisions on or off. Enabled collisions create more complex and unpredictable motion. Disabled collisions keep balls independent.
- Mod Wheel Function: Allows reassignment of the MIDI modulation wheel to Collider parameters including Walls, Gravity, Time, Decay, and Patterns.
- Max Ball Bounces: Sets how many times a ball can bounce before it disappears.
- Channel Selection: Select which MIDI channels Collider can use. Using more channels allows Collider to play more notes at the same time.
Moving Wall Corners
The wall handles shape the funnel that the balls bounce through. Moving the top corners changes the wall angle. Moving the bottom corners changes the distance between walls. The little triangle to the left of the wall (the launch pad) shows where the balls launch from. You can drag this up or down. Changing the wall angles often involves tweaking Gravity to ensure the ball doesn't bounce up into space.
Musical Controls (The Sequencer)
At the upper right is the Sequencer, where you can select a scale, direction of sequence, and the sequence of notes (the "Pattern").
- Sequence button: Determines how Collider moves through the notes in the selected Pattern each time the ball bounces.
Select none, Up once, Down once, Up twice, etc. or random. For example Up would play 0,2,4 as - Pattern: Selects the ordered set of notes available to the sequencer. (see below)
Select up to 16 notes in a four octave range centered on the played note. - Key: Sets the root note used for generated notes.
- Scale Mode: Sets the scale or mode used to interpret the Pattern.
- Keyboard: Change the scale by toggling any note within an octave.
The Scale Designer
At the top right is the Scale Designer. You can select the root key, and the type of scale using the two top buttons.
Any note on the scale keyboard can be toggled on or off by tapping on it.
The scale selected contricts all bouncing notes to fit into that scale, by moving them to the closest note, or down in the case of a tie.
You can toggle a key on or off on the Scale Selector Keyboard while playing. It will affect all existing bouncing balls and restrict their new bounce notes to the new scale.
The Pattern Designer
The Pattern Builder allows you to build sequences of notes that will be played sequentually, triggered by every new bounce. Add notes by clicking on the next available column on the piano roll, or tap the keyboard icon and enter notes in sequence using your MIDI device.
The first note becomes the root of the pattern (the played note). For example if a pattern is C, E, G, (C major Triad) C is the root. When a D is played the sequence will be D,F#,A. If you're Scale Selector is set to C Major, it will transpose the F# down to F, resulting in D,F,A or D minor Triad.
To delete a note, long touch a note. A short tap coverts it to a rest note (orange dot). You can replace a note by clicking a different note in the same column.
"Undo" removes the last note. "Skip" adds a rest. "New" starts an empty pattern. "Save" stores the pattern, either as a new pattern or by overwriting an existing one.
Loading Presets
Use the preset menu to load saved or factory Collider settings. Presets include physics settings, musical settings, wall positions, bounce behaviour, mod wheel assignments, and performance options. Presets are sorted by colour. Selecting a colour before saving will add it to that particular colour section.
Saving Presets
After creating a sound or behaviour you like, save it with a new name. Even tiny changes can produce very different music: save it!